Original Title: The Race to 100 - Frames-to-Kill Featuring Hitrater and 3VN’s Shooting Mechanics, posted on July 12th 2015
Author: Veritable
Tools Used
3VN’s BF4 Shooting Mechanics for automatic weapons and for DMRs
AdmiralGiggles’ Hitrate Simulator
Formula calculations and worksheet hosted at Google Sheets
Premise
I started looking into this to shed some light into how the Stubby / Potato Grip now works in the post Spring-2015 Patch world. As you may have heard by now, using Grips slow down your Spread Recovery. The Stubby, though, also LOWERS your SIPS, so even though you will recover Spread slower, you also have LESS to recover from, in addition to doing slightly MORE damage within the burst. So, which is better? Use Stubby and shoot for longer, or use Naked to recover quicker so you can shoot again?
Then it kinda cascaded from there. Can you use HBar’s SIPS buff to counteract the Ergo / AFG Spread Recovery penalty? What IS the “optimal burst length” now that we know BF4 runs on 30Hz “Frostbite TIme?” Can low-RPM weapons really out-damage high-RPM ones by clicking properly?
I don’t have all the answers, but let’s scratch the surface together!
Workflow
-
The engagement range for this simulation is 50m ADS - Not Moving.
-
Note down SIPS, Spread Recovery and 50m Damage values for the gun + attachment combination
-
Using 3VN’s Shooting Mechanics tables linked to above, count how many “Frostbite Time” Frames it takes for the gun’s assigned RPM value to fire the Burst Length and then be ready to fire again. For example, if we are looking at 3 Rounds Burst for a 900RPM weapon, the 4th bullet can be fired at Frame 7, so the count is 6.
-
Burst lengths I am looking at are 1RB, 2RB, 3RB, 4RB, 5RB and 6RB.
-
Using Hitrater, simulate the weapon + attachment to fire 6RB, and then enter the 6 individual Hitrates into the Worksheet. V-Recoil ignored and H-Recoil centered if needed.
-
Multiply the 50m Damage value for the gun with the Hitrate % in order to get the expected damage for each bullet within the burst.
-
Add the expected damage to the desired burst length that we are looking at, to get a Burst Expected Damage value. For example, to see the Expected Damage of a 3RB:
((bullet 1 hitrate %) * (damage)) + ((bullet 2 hitrate %) * (damage)) + ((bullet 3 hitrate %) * (damage)
- Figure out how many frames it takes for the gun to fire this burst length, be ready to fire again but you don’t, so then it recovers the Spread Increase. Again for the 3RB example:
(((SIPS * 3) / (Spread Recovery)) / (30 Frames per Second)) + (Frames to 3RB)
-
Figure out how many repetitions it takes for this burst length to deal 100 damage. For example, if this gun + attachments is expected to deal 100 damage with a 3RB, and it takes 20 Frames to fire and then recover from its 3RB, then the answer is 20 * 1 = 20. If that gun + attachments is expected to deal 50 damage with the same 3RB, and it takes 8 Frames to fire and then recover from that, then the answer is 8 * 2 = 16.
-
BTW, for the above 2 samples, the first one is the M39 EMR Naked + Naked, while the 2nd one is the AEK-971 Comp + Stubby. You can now say that the AEK as set up as such can kill 4 frames faster than that M39, so for this 50m ADS - Not Moving scenario it is better by that much.
-
Produce an overall chart, and also individual charts for each attachment combo per gun.
Weapons Studied
-
ACE 23 Assault Rifle, because I believe it is the basis around which all BF4 guns are balanced around
-
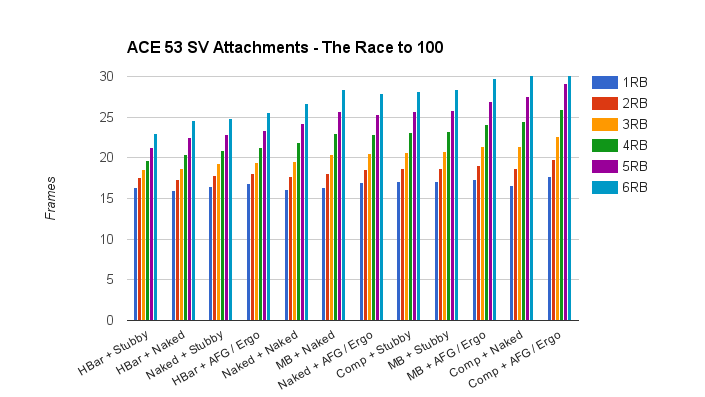
ACE 53 SV DMR, a lower-than-normal-SIPS DMR with standard 260RPM
-
AEK-971 Assault Rifle, a 900RPM entry and a focus of everyone’s wrath
-
G36C Carbine, something that I’m interested in using and represents the 650RPM “long range Carbine”
-
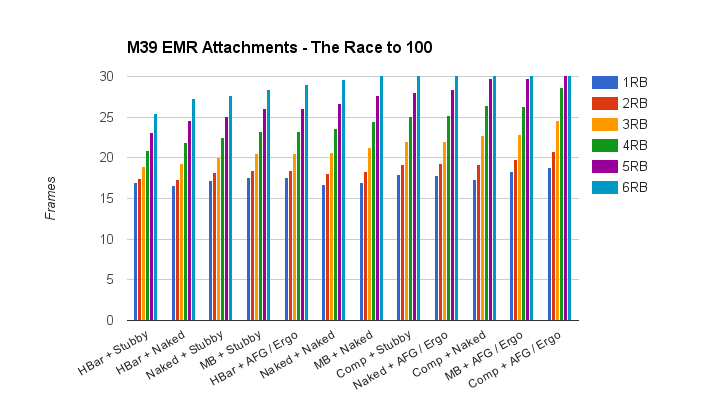
M39 EMR DMR, because it is what I’m currently using and would like to lear more, and also to see if the extra 40RPM over the ACE 53 actually means anything
-
M4 Carbine, because Dodo asked a similar question and I’m a nice guy so I want to help out a fellow Canuck

-
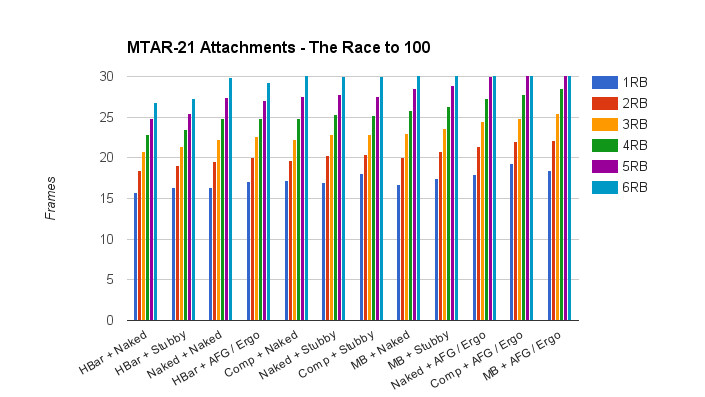
MTAR-21 Carbine, 900RPM Carbine that represents close to a “worst case” scenario
Attachment Combinations Studied
-
Comp + AFG / Ergo
-
Comp + Naked
-
Comp + Stubby
-
HBar + AFG / Ergo
-
HBar + Naked
-
HBar + Stubby
-
MB + AFG / Ergo
-
MB + Naked
-
MB + Stubby
-
Naked + AFG / Ergo
-
Naked + Naked
-
Naked + Stubby
AFG / Ergo do nothing to affect the damage output of 50m ADS - Not Moving, while slowing your Spread Recovery, so they are purely burdens. However, they are still interesting to look at because you will definitely make use of their other traits in other situations, so you might still choose to equip them, despite their poor showings here.
The same as above can be said for MB. Except for specific low H-Recoil cases it has the worst damage output. However, depending on V-Recoil values you might still need it, and its SIPS penalty is not as bad as the Comp, so you MIGHT be able to recover and start firing faster.
In usual cases, Comp outputs more damage than Naked, not to mention MB, but its SIPS penalty will slow your next burst by quite a bit. In unusual high H-Recoil cases (AEK and MTAR so far) it will out-damage HBar at short burst lengths. In unusual low H-Recoil cases (G36C, usual DMRs) it makes the gun worse than Naked.
HBar lowers SIPS and also halves ADS - Not Moving Spread so it is no surprise that it will out-damage and then allow you to fire the next burst earlier, thus topping the charts. Can you handle the V-Recoil, though?
Naked has no benefit nor drawbacks. Is that enough?
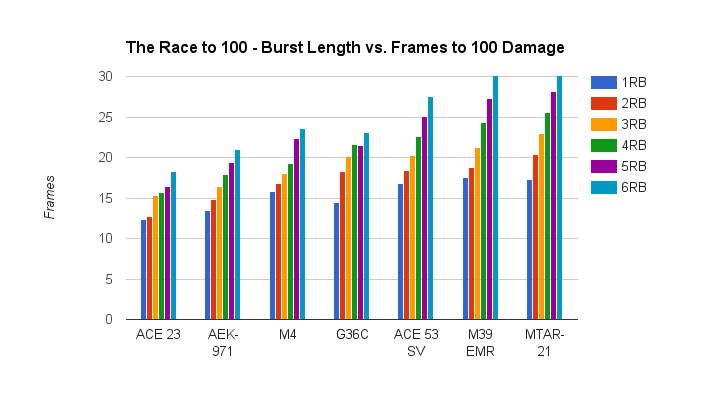
Overall Chart - Lower the Better - Sorted by Average Frames Left -> Right
-
800 - 900RPM shoot the same within 4 bullets. So, if you are doing up to 4RB, then just use the lowest RPM one among them for their better stats.
-
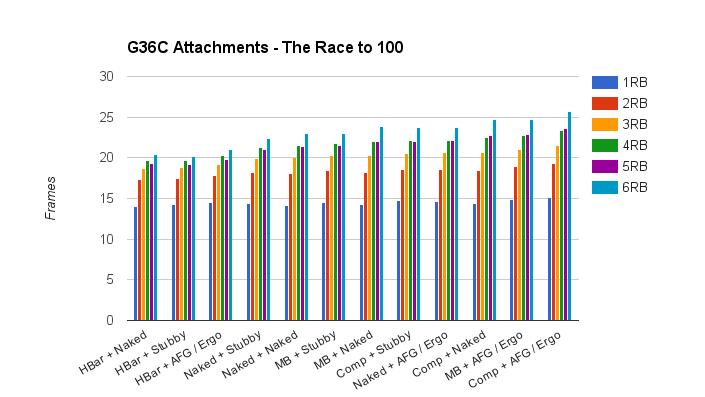
The big gulf between the G36C 1RB and 2RB is because it takes the same 2 Frames to shoot 1 round but 5 frames to shoot 2. So, if you can rock it semi-auto then use the G36C, but if not then use the M4’s 3RB (it kills faster than G36C’s 2RB).
-
M39 EMR’s 40RPM “advantage” is meaningless here because it only allows you to fire 1 Frame earlier than the ACE 53 SV, but you will most likely spend that Frame (and more!) recovering from its high SIPS. Will need to look at more DMRs to complete the picture, and I’ll probably keep using it thanks to its Velocity superiority, but I’m definitely thinking more about its attachment combos and shooting patterns now.
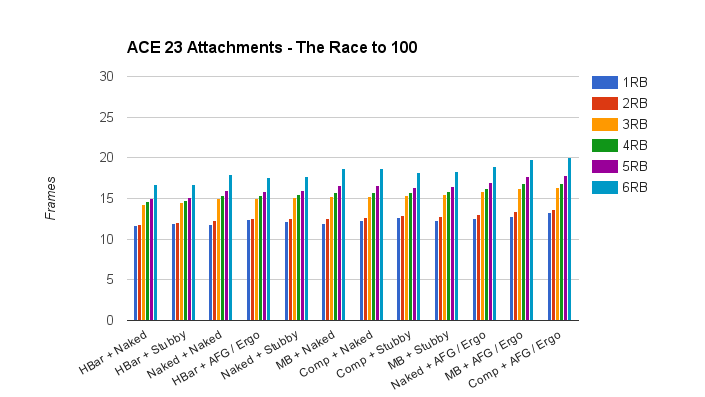
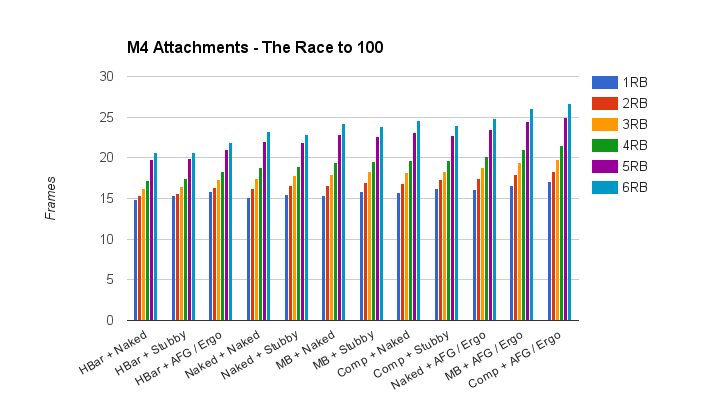
Attachment Charts for Individual Weapons

-
As expected, HBar + Naked is statistically the best for very short bursts. However, keep in mind that this is only because I am carrying the decimals. In “Frostbite Time” and vs. HBar + Stubby they probably feel the same, and Stubby will perform better when you have to do panic full-auto hold-trigger-until-death. There might be causes where the Stubby’s extra decimals carry it over to the next Frame, but a quick check in the Worksheet does not show that. Might happen with other guns, though.
-
For most weapons, the old adage that the “optimal burst rate” is 2RB mostly holds true, but we can already see that 650RPM causes some issues with that technique. More weapons need to be looked at to see if that continues.
-
1RB will forever be the best. Happy now, Dodo?

-
The ACE 23 HBar + Stubby shooting 6RB can kill faster than the M39 EMR doing 1-and-recover in all cases except 1: the M39 HBar + Naked. 770RPM might just be that sweet spot that everyone is looking for.
Final Note
Please note that all decimals are carried on, despite “Frostbite Time” should be discreet 1/30 frames and you can only either fire or not fire within the frame. So, please don’t use the Worksheet as a true “burst length” guide… to truly do so, you probably have to Round Up each frame value in order to fire at true Base Spread. The reason why I carried all the decimals is so minute differences can still be ranked. To Round Up the frame values will result in a lot of the attachment combinations performing the same… as certain weapons turn out to be just as accurate and damaging with Comp as with HBar, while shooting them the same way… which is probably the correct way to look at it going forward.
Conclusion
Can we draw any? I’m not sure about that; this is just a very small sample of weapons available in BF4. Plus, I don’t think I know enough to make any sweeping statements. If pressed, though, I guess I can make some observations…
-
This is a VERY specific scenario, so don’t be discouraged from using AFG and Ergo if you need to, as long as you understand what they do and what their limitations are.
-
Whether or not you need HBar vs. just running Naked Barrel is dependant upon whether or not your ADS - Not Moving Spread can guarantee that 100% Hitrate on the 1st shot. As you move closer to your target, then Naked Barrel (or Comp, depending on H-Recoil for the gun you’re using) is just fine. As you move farther, though, then the HBar will be more and more important; no amount of trigger control and perfect bursting will help you if even the 1st shot can’t hit at 100% - the MTAR-21 at 50m is already suffering from that.
-
The same as above holds for Naked Underbarrel vs. Stubby Grip. The longer you shoot, the better the Stubby becomes. Shoot shorter bursts with Naked and be able to be ready to shoot again faster. Shoot longer bursts with Stubby to do more damage within the burst.
Additional Gun Charts
L86A2 Support added by request:
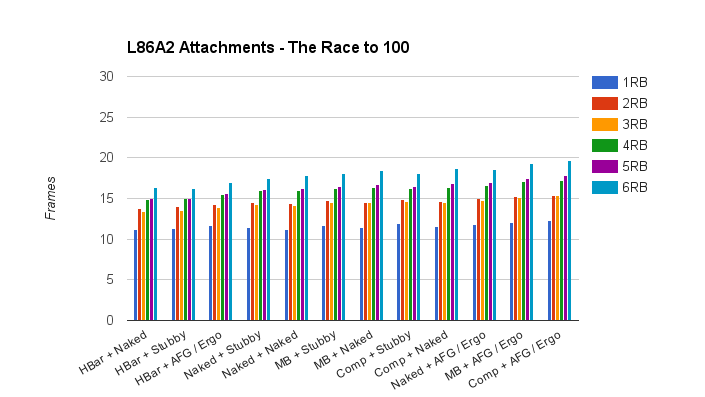
If can’t do 1RB then 3RB kills faster than 2RB. If set up properly kills faster than AEKs.
SCAR-H SV and Mk11 Mod 0 added because I’m still a DMR guy and I’m curious:
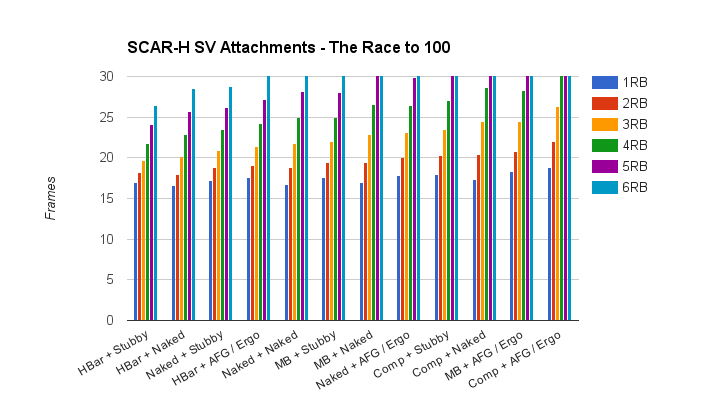
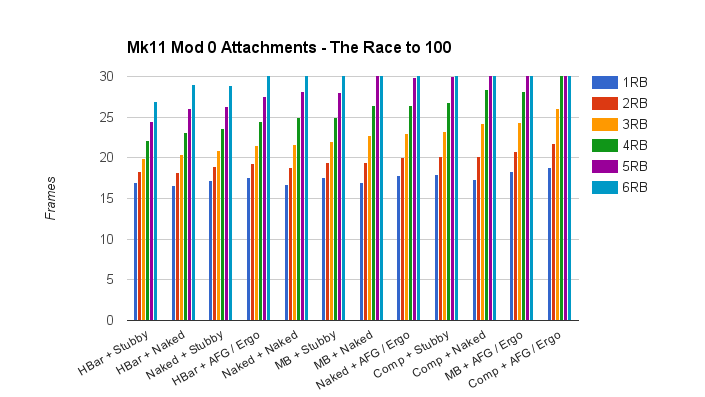
SCAR-H SV is marginally better thanks to H-Recoil while all other (relevant here) stats are the same. I am now running SCAR-H SV + Suppressor (same as Naked) + Potato Grip.